你说我一个学客户端的,怎么去研究前后端了呢?
这段时间因为手里项目的关系,要写点前端和后端的东西。需求上还挺奇怪,要实现登录,不允许有注册功能而是要求接入企业微信。对我这么个写客户端的来说,前后端说陌生也不陌生,说熟悉也算不上。那需求摆在这里了,总得写吧。
后端
Duende Identity Server 的搭建与配置
虽说之前在实习的时候,组里出过一次名为《给 Kotlin 客户端研发的后端入门教程》,用到的技术栈是 JetBrains 官方的 Ktor 框架。但因为之前稍微用过 .NET Core 那一套,并且我一直很喜欢 C# 里的 LINQ,就还是继续用 .NET Core 了。Ktor 也稍微了解过一点,但看了下社区感觉不算很活跃的样子,还是算了。
.NET Core 这边有一个官方+社区的认证服务器框架,叫 Identity Server。出到版本 4 之后调整了一下策略,保持开源的情况下有了新的商业化运作。不过这都不是我们要研究的重点。
在 Github 上另外有一个开源的项目叫 Duende.IdentityServer.Admin,对 IS 进行了一些包装,在业务上没有比较个性化的需求时,可以几乎做到开箱即用。根据 Readme 完成脚手架的搭建,并配置好数据库之后,基本上就可以直接使用了。
对于需要接入认证的应用,首先我们需要在 IS 的后台配置一个 Client(客户端)。根据不同类型的客户端应用,Open ID Connect 提供了不同的认证流程(Flow)。由于 React 的 OIDC 客户端只支持 Authentication Code Flow,因此选提供了该 Flow 的选项即可。
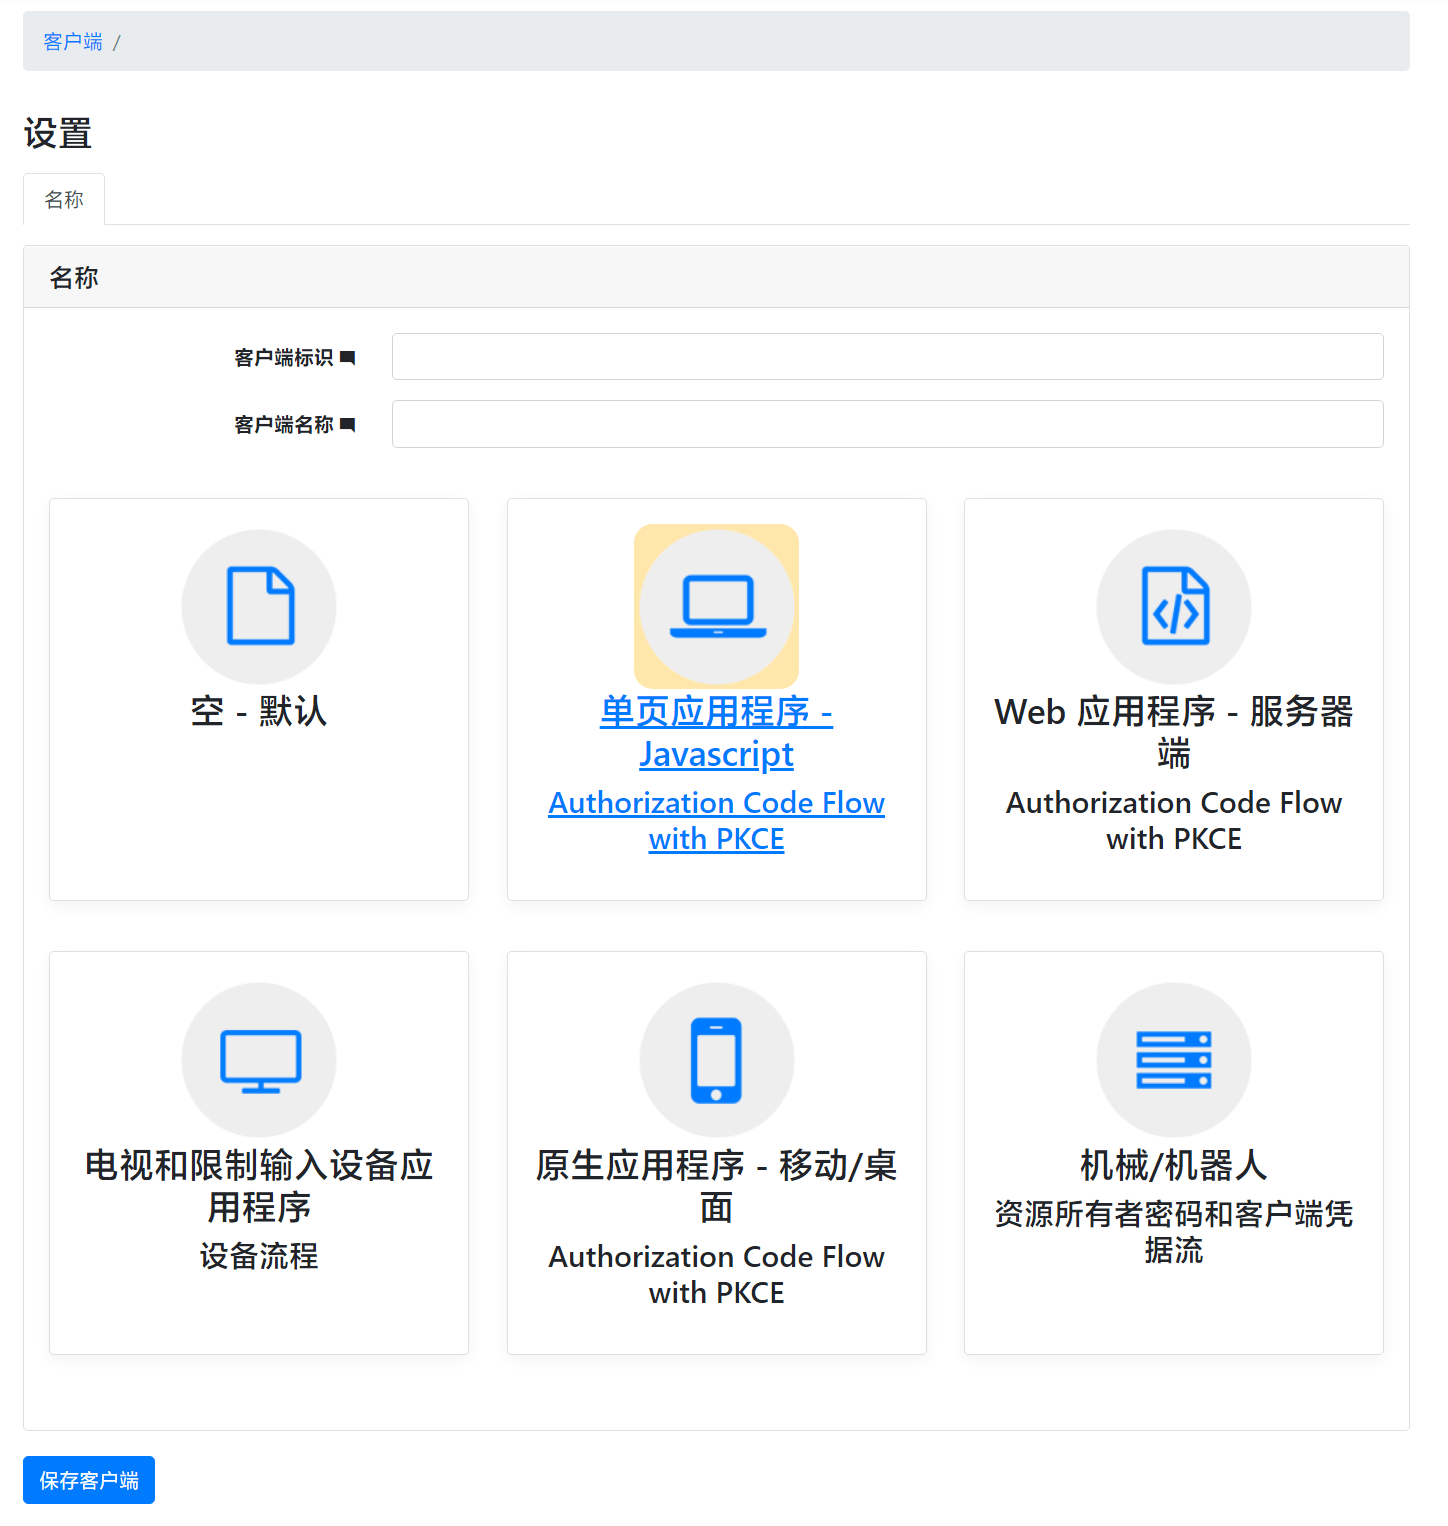
然后需要对客户端进行一定的配置。如下图所示,只勾选“允许通过浏览器访问令牌”。默认情况下“需要 Pkce”也是被选中的,但 React 的 OIDC 客户端我尝试了很久都没能在这个选项开启的时候成功认证,那就索性先关闭了。

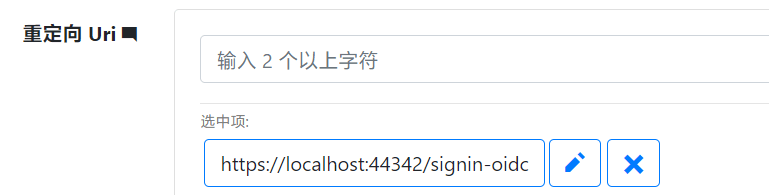
接下来配置“重定向 Uri”,这个选项对应了认证页面 URL 中的 redirect_uri 字段,只有在这里配置了的重定向 Uri 才会被允许跳转。在本地开发的时候注意也需要加上 localhost。
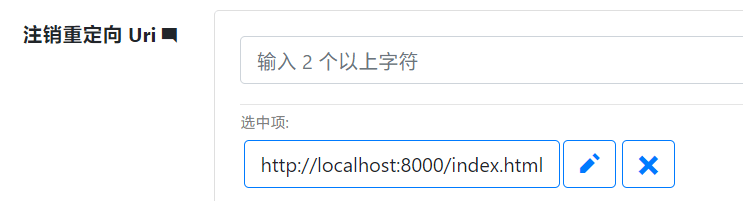
在“认证/注销”选项卡中有一个“注销重定向 Uri”,这个配置用于指定用户主动注销会话后的重定向 URL。实际上是否会被用到取决于 OIDC 客户端的实现。
在“令牌”选项卡中,需要配置“允许跨域来源”。这个配置是相当重要的一个选项,关系到浏览器跨域请求能否进行。注意协议和端口号一定要完全一致。

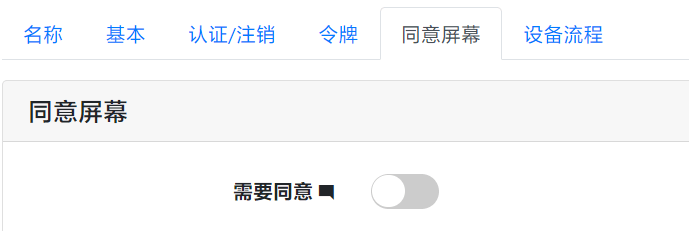
最后在“同意屏幕”中可以选择是否关掉同意屏幕。所谓同意屏幕,就是类似于 QQ 授权登录的是否确定要登录目标网站。如果浏览器存在着认证系统的有效会话,就会直接跳过这个步骤,直接重定向。
至此 IS 的配置部分就完成了。
IS 接入企业微信登录
在解决方案的 *.STS.Identity 项目中添加 AspNet.Security.OAuth.WorkWeixin 包。这个包封装了和企业微信登录的交互,我们只需要配置好申请到的密钥等信息即可。
然后打开 *.STS.Identity 下的 StartupHelper.cs 文件,找到 AddExternalProviders 方法,加入下面的代码:
if (externalProviderConfiguration.UseWeComProvider)
{
    authenticationBuilder.AddWorkWeixin(options =>
    {
        options.ClientId = externalProviderConfiguration.WeComCorpId; // corpid
        options.ClientSecret = externalProviderConfiguration.WeComCorpSecret; // secret
        options.AgentId = externalProviderConfiguration.WeComAgentId; // agentid
    });
}
ClientId、ClientSecret 和 AgentId 三个参数分别对应了企业微信后台应用的 corpid、secret 和 agentid。
然后重新编译运行,就可以看到登录界面多了一个“外部登录”选项。
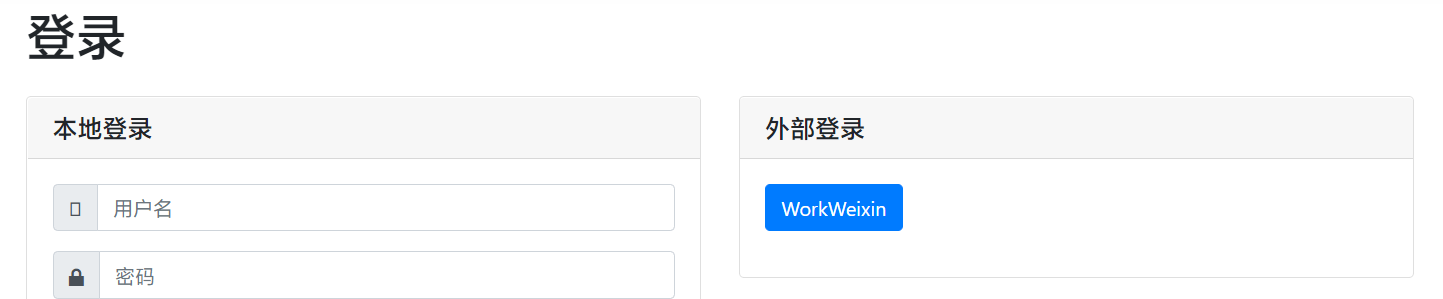
点击之后就可以正确跳转企业微信的扫码界面了。

前端
前端除了要配置 OIDC 客户端之外,还需要对原有的 AntD Pro 脚手架做比较大的一些改动。
我这里使用的 AntD Pro 是最新版本,语言选的 TypeScript。首先给项目中添加 oidc-client-ts 这个包。从名字就能看出来是 OIDC 的客户端。
首先新建一个文件用于存放认证服务器信息,这里将认证信息存放到了浏览器的 Local Storage 中:
export const oidcConfig = {
    client_id: 'your_client_id',
    redirect_uri: `${window.location.origin}/user/login`,
    scope: 'openid roles profile',
    authority: 'your_auth_server_uri',
    userStore: new WebStorageStateStore({ store: window.localStorage }),
    loadUserInfo: true
}

export const oidcLocalStorageKey = `oidc.user:${oidcConfig.authority}:${oidcConfig.client_id}`
找到 app.tsx 文件,将 getInitialState 修改为:
export async function getInitialState(): Promise<{
  settings?: Partial<LayoutSettings>;
  currentUser?: User;
  loading?: boolean;
  fetchUserInfo?: () => Promise<User | undefined>;
}> {
  const fetchUserInfo = async () => {
    const oidcStorage = localStorage.getItem(oidcLocalStorageKey)
    return oidcStorage ? User.fromStorageString(oidcStorage) : undefined
  };

  if (history.location.pathname !== loginPath) {
    const currentUser = await fetchUserInfo();
    return {
      fetchUserInfo,
      currentUser,
      settings: defaultSettings,
    };
  }
  return {
    fetchUserInfo,
    settings: defaultSettings,
  };
}
注意这里的 User 是 oidc-client-ts 的一个类。fetchUserInfo 闭包主要用于将 Local Storage 里序列化存储的登录信息反序列化为 User 对象。
然后,在 RunTimeLayoutConfig 的返回值中,rightContentRender、footerRender 和 childrenRender 分别用 <AuthProvider {...oidcConfig}></AuthProvider> 包裹一下,用于为组件开发提供认证信息 Context。注意导入一下上面提前定义好的 oidcConfig。
onPageChange 也需要进行一些改动,这里给出一种参考实现。主要思路是在本地没有用户信息或者 Token 过期的时候能重定向到登录页面。
onPageChange: () => {
    const oidcStorage = localStorage.getItem(oidcLocalStorageKey)
    if (!oidcStorage && location.pathname !== loginPath) {
        history.push(loginPath)
    } else if (oidcStorage && location.pathname !== loginPath) {
        const currentUser = User.fromStorageString(oidcStorage!)
        if (currentUser.expired) {
            history.push(loginPath)
        }
    }
}
在 src/components/RightContent/AvatarDropdown.tsx 进行修改,使得在头像下拉菜单中能显示用户名:
const auth = useAuth() // 用于提供退出登录等用户登录态管理功能
const { currentUser } = initialState // 从 initialState 中获得当前用户信息

return (
    <HeaderDropdown overlay={menuHeaderDropdown}>
        <span className={`${styles.action} ${styles.account}`}>
            <Avatar
                size="small"
                style={{
                    background: backgroundColor,
                    color: foregroundColor
                }}
                className={styles.avatar}
                alt="avatar">
                {currentUser.profile.preferred_username[0].toLocaleUpperCase()}
            </Avatar>
            <span className={`${styles.name} anticon`}>{currentUser.profile.preferred_username}</span>
        </span>
    </HeaderDropdown>
)
在 access.ts 中可以对接 AntD Pro 的权限系统,这里只简单区分一下是否为管理员用户。User 还是 oidc-client-ts 提供的类型。
export default function access(initialState: { currentUser?: User } | undefined) {
    const { currentUser } = initialState ?? {};
    return {
        canAdmin: currentUser && currentUser.profile.role === 'Administrator',
    };
}
这样基本上就完成了 IS 和 AntD Pro 的对接。至于如何在 .NET Core 中完成和 IS 的对接,网络上已经有不少的资料,就不再赘述了。